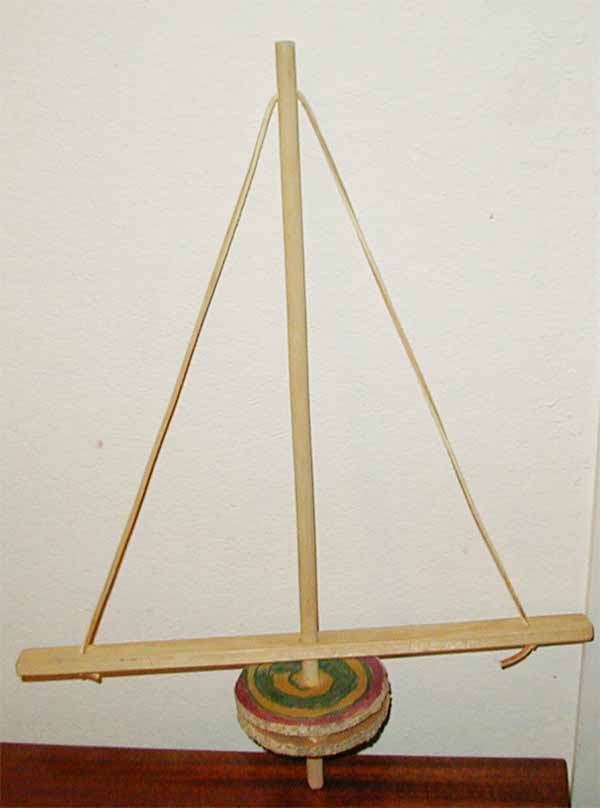
Homemade Indian Hand Drill made by Scott Zeise
We visited a museum up near Tahoe. It had an exhibit of Indian things from the Wahoe tribe. I became interested in an Indian hand drill. It was not easy to use, but I practiced and learned how to use it. I wanted one of my own, so after we got home, we had fun making and using it.
By Scott Zeise, September 2, 1994 (Age 9)
Here is how we did it
First we got some stuff at the hardware store and around the house:
- a 3/8″ dowel
- 1/4″ x 1″ piece of a pine stick
- some sandpaper
- some thick cardboard
- a drill and 2 bits big enough to make a small holes for the shoelace and a big one in the base of the stick for the dowel to go through
- a nail
- a leather shoe lace
- glue
- hammer
- heavy duty cutter
Sawing and Sanding
- Take the flat pine board and saw it 14-15″ long. Sand it, especially the edges.
- Saw the dowel to about 20″ long. Sand the ends. Save the bits removed for the fly wheel.
Drilling
Next you need to drill some holes.
- On the dowel, about 1″ from the top, drill a hole just big enough for the leather shoe lace.
- On the flat pine board, drill 2 holes the same size as before, about 1″ from both ends.
- In the exact middle of the flat board drill a large hole so the dowel can fit through. We had a problem with this as we didn’t have a bit big enough, so we drilled lots of little holes and sanded a lot. The dowel must fit through this hole loosely, but not flop around.
Making the Cardboard Fly Wheel
From some thick cardboard, cut circles about 4″ in diameter across, or bigger. This is needed to cause momentum. It will not work well without this part. We put little pieces left over from the 1″ stick between the cardboard pieces like a sandwich, to give some weight and thickness. Poke a hole with the dowel through the center of the cardboard disk.
Adding the Leather Shoelace
- It will look like a sailboat when you get done.
- Thread the leather half way through the hole at the top of the dowel. Make sure you have two equal parts of lace on either side.
- Slide the flat board on the other end of the dowel up about 5″ from the bottom.
- Thread the ends of the leather lace through the small holes on the ends of the flat board.
- Tie knots on the underside, but for now leave extra lace dangling until you see if it is just right. Trim later.
- Even up the laces on each side.
Finishing Touches
- Last, if you want, color the cardboard fly wheel so it will change colors when spinning. We don’t know if the Indians did this, but it looks pretty spinning.
- Slide the disk up to 1″ below the flat board. Glue it there to the dowel. Wait for it to dry.
We tried it without the cardboard circle, but it needed to act like a fly wheel to give it circular momentum. Something spinning wants to keep spinning. the leather makes like a screw or inclined plane that you make go up and down. You’ll see.
- Finally, hammer a nail in the very base of the dowel to make the “bit.” Trim with a heavy duty cutter so only about 1/2″ sticks out from the dowel. We cut it straight across. See what happens if cut at an angle. It might be sharper.
Working the Hand Drill
- Drill into an old piece of wood, not your Mom’s table! Be careful not to touch the nail bit after drilling: it gets hot from the friction.
- First you spin the stick, and when it winds up as tight as you can get it, have one hand hold the stick near the dowel, so it won’t unwind until you are ready.
- Put the other hand at one end of the board, then quickly put the first hand at the other end of the board. and push it up and down. It kind of works like a yo-yo.
Wow! History and physics and art and you wind up with a tool you can really use.
Only one question I had: How did the very first hand drill get made since it needs a drill to make it?


